How to build a Raspberry Pi Air Quality Station
Update: I’ve written a new article about how to connect the Nova SDS011 air quality sensor to Apple Homekit via Homebridge! This makes things a lot easier in regards to working with the actual results.
Since I planned to (and eventually did) move to Beijing this year, a standard question I get is the one about air quality. And indeed, although things have improved considerably over the years, the checking of the AQI (Air Quality Index) has quickly become a habit of mine. Why? Well, this is a photo I took in April 2018:

Oh, this? No, this is just fog.
I don’t remember what the AQI was back then, but it apparently can’t be too good for your overall health if you are continuously exposed to this. This is the reason people get indoor air cleaning devices here. Yes - if you ever thought this is purely a marketing thing to get people to buy useless crap, here, you actually need those.
But do they work? Is it worth paying the hefty price of these things as well as the electricity bill and living with the noise level? Let's find out!
I have been wondering what kind of more serious projects I could do with my Raspberry Pi and go course our favorite language: Python. This seemed like a perfect little exercise that would actually be useful!

Image credit: https://xkcd.com/353/
So I went and hacked together a little Raspberry Pi weather station that can also monitor air quality. On top of that, I also wanted it to be remotely accessible, so I can watch the values while at work. This is a real internet-of-things project!
I would have loved to do an outdoor version, but 1. the equipment is as far from waterproof as can be and 2. I imagine that the building management might have a word to say in whether I can hot-glue stuff to the buildings facade.

- Don’t mind me, just cleaning this so the glue sticks better.
- What?
- What?
This is an entry-level programming article, so if you are a little more advanced, just skip ahead and for the sourcecode. But if you want to go through this step by step and maybe learn something along the way, read on! We are going to build a Raspberry Pi with a Nova SDS 011 particle sensor, a SenseHat and make this send all the results to Freeboard.io via dweet.io so we can watch the values over the internet.
So, without further redo, here’s my little weekend project, originally based on this article at Hackernoon.
Equipment
Hardware
Note: You can go for the Raspberry Pi Model 3B+ starter kit. It has the Raspberry Pi, an SD card, a charger and a case in it, so you don’t need to buy these separately. On top of that, the SD card comes already with NOOBS pre-installed, so you can start the PI right up without having to prepare the Operating System first!
Also note: I use Amazon Affiliate Links here, just as on my book-list. That means I make a small amount of money if you buy anything through these links!
Raspberry Pi Model 3B+ (I don’t think you necessarily need a fancy model for this, but I went for the newest one). This would be included in the starter kit!
Short IDE Cable (to separate SenseHat and Pi - the temperature reading is wrong if the Pi is directly over the board)
Everything you need to run the Pi:
power connector with a specific power output (2.5A). This would be included in the starter kit!
Micro SD card. This would be included in the starter kit (and already with an Operating System installed on it)!
HDMI cable
Peripherals to operate the Pi (at least until you have everything running): Keyboard, Mouse, (HDMI-connected) Screen
Software / Accounts
Standard Raspbian (you can buy this with the starter kit or just download for free. Note: if you go for a pre-installed version, make sure it is the most recent one or your Pi might not boot with it (see this thread for details) and you need to do a manual install nevertheless.
A freeboard.io account. By the time of writing this, you get a month of free usage)
dweet.io. No need to setup an account here, I just list it for later reference
1. Hardware assembly
As always, the first step to get this to work is to plug all necessary things together. With the Pi, this is fairly easy, since most components you need for a computer to run are already built into it.
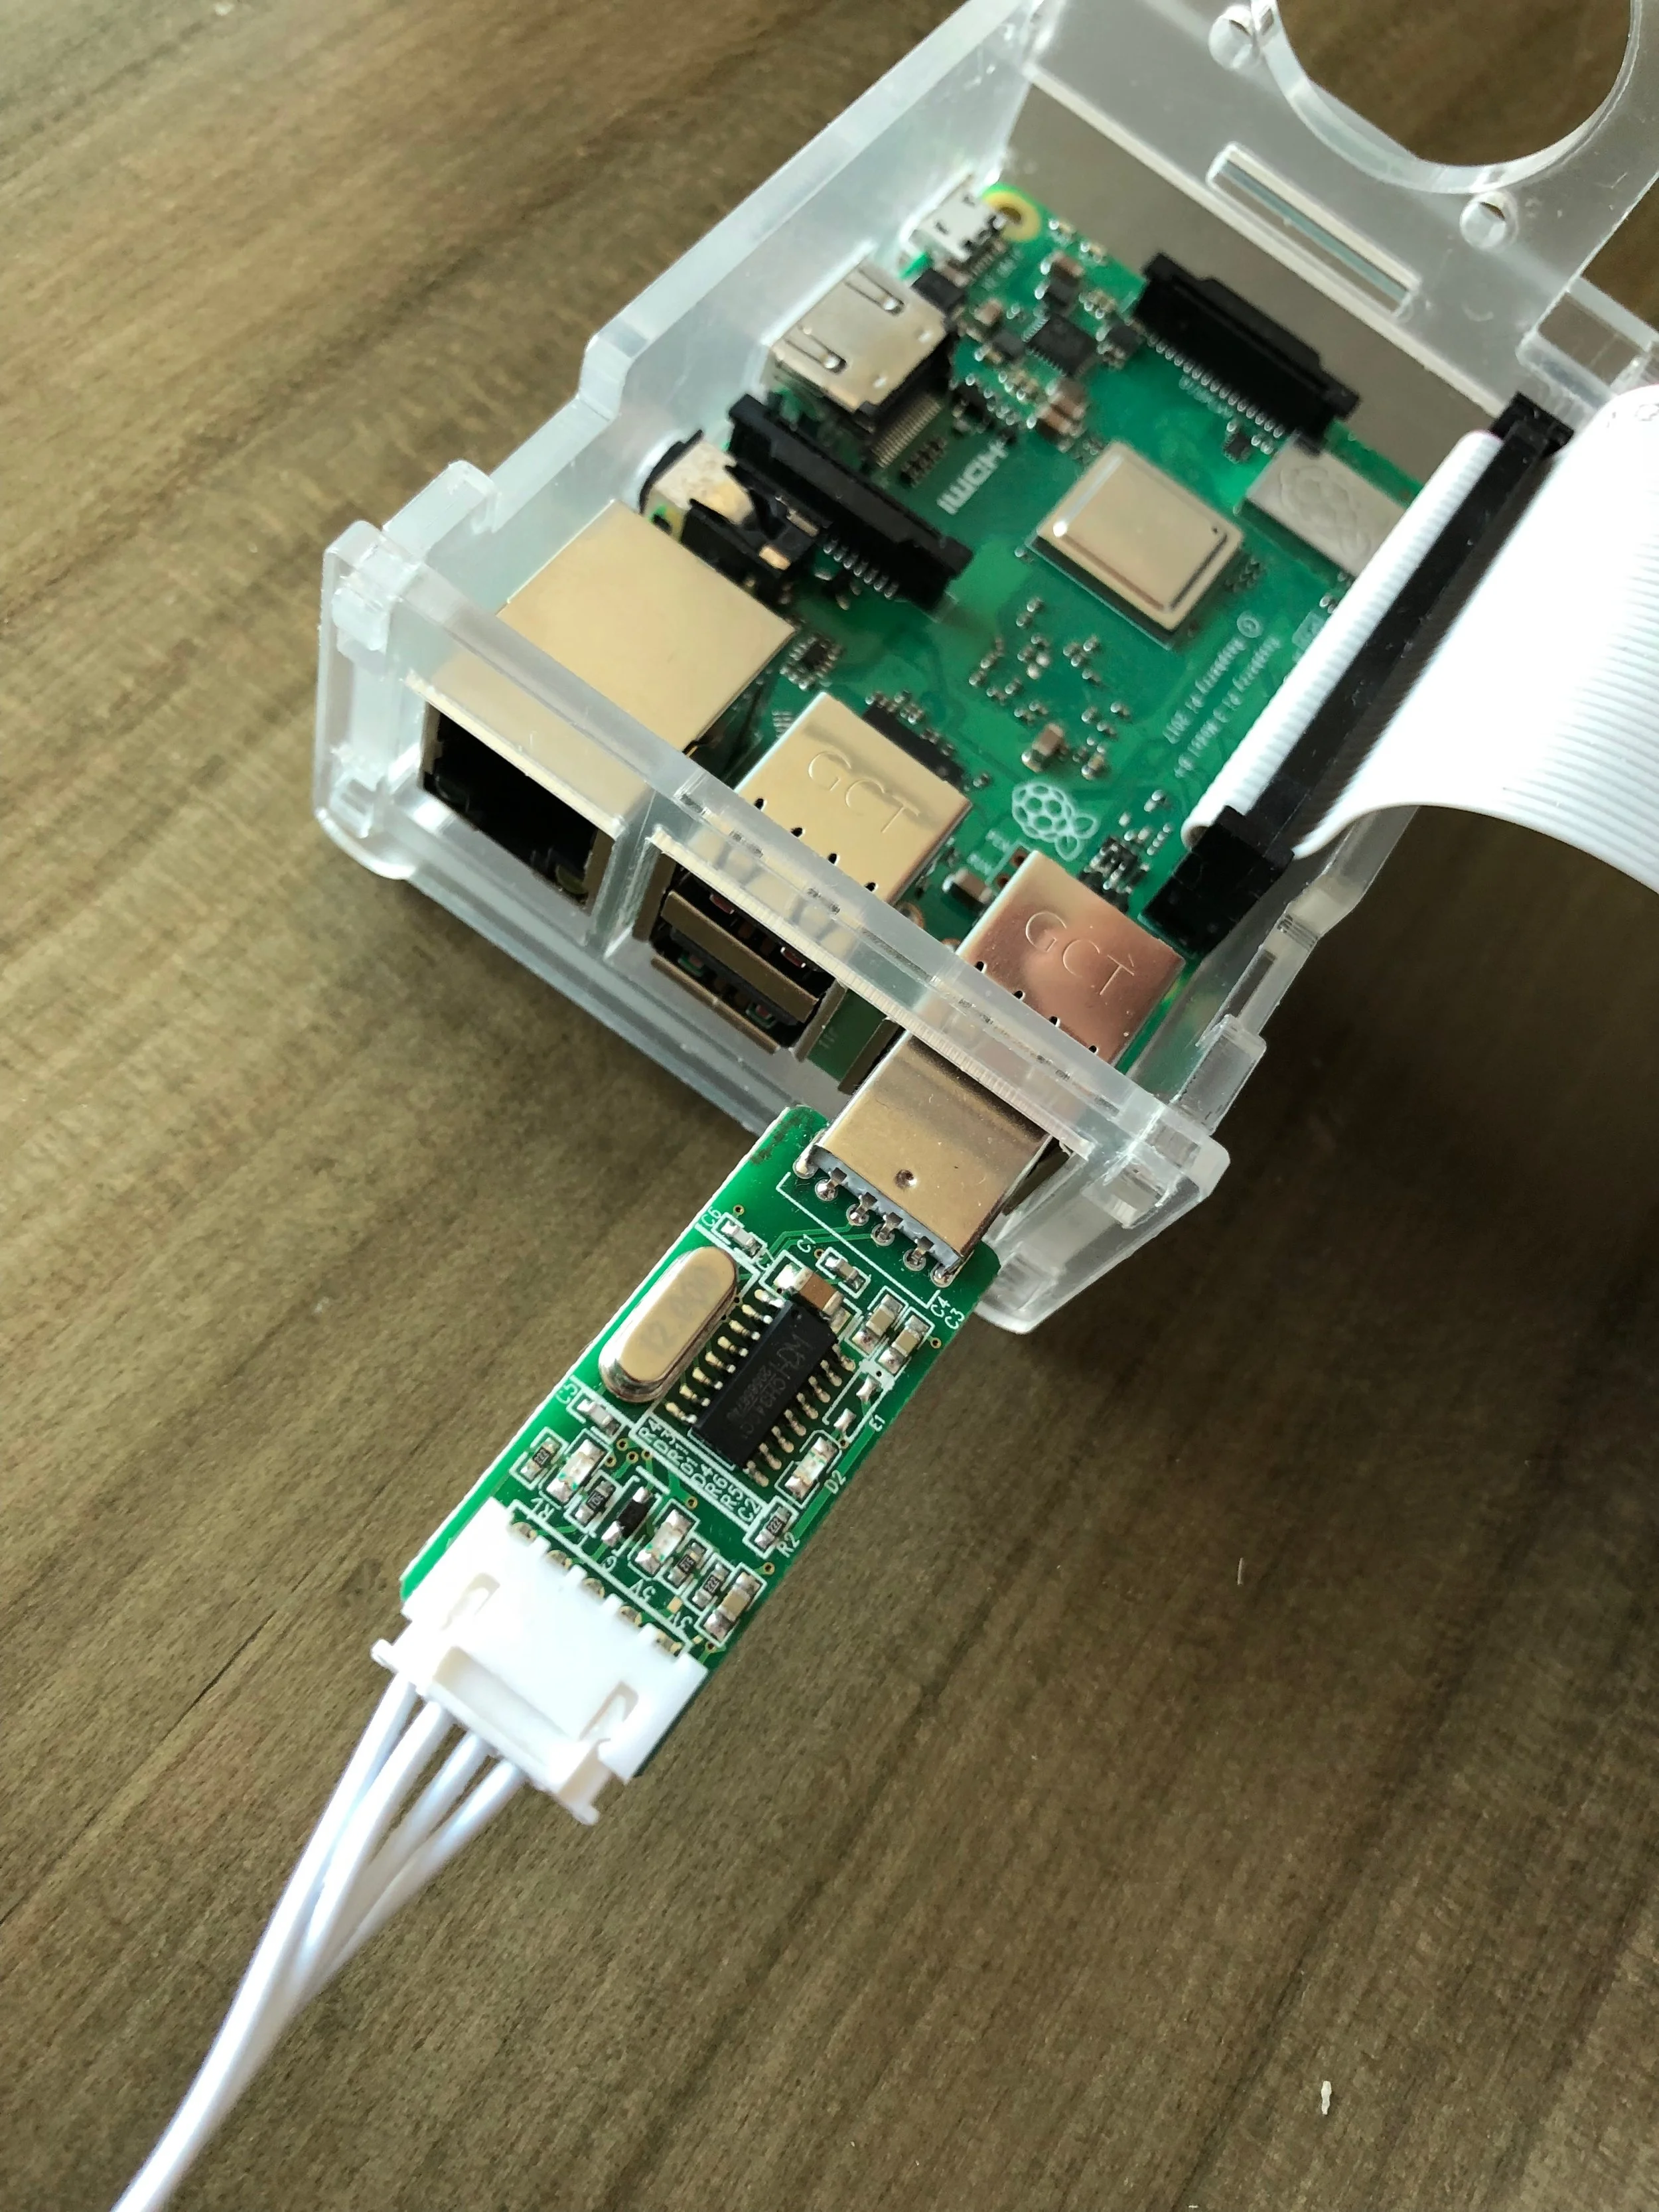
Before we plug in the power connector, we connect the SenseHat with the IDE cable. The SenseHat is actually made to be stuck directly onto the Pi, but I’ve found that this gives me wrong (read: too high) readings on the temperature sensor. This is probably due to the heat generated by the Pi itself heating the SenseHat. If you don’t use an IDE cable, connecting the SenseHat is actually pretty straightforward - just plug it on top of the Pi.
If you are using an IDE cable though, first plug the IDE cable into the Pi’s large connector:

Then plug the SenseHat into the cable:

Make sure you put it in the correct way around. The SenseHat should be on its head when the cable is stretched out:

Next, we simply connect the SDS particle sensor by plugging it first into the USB connector and that into the Pi.

Connect your peripherals like mouse, keyboard and screen and we are almost good to go!
2. Installing an Operating System
Just like your PC or Mac, the Raspberry needs an operating system to run. This makes sure you get a graphical interface (if you want/need one), your mouse and keyboard work, you can connect to a WiFi, etc. What is Windows for PC, MacOS for Mac, iOS for iPhones and Android for lots of other phones, the Raspberry Pi runs on Raspbian. Now, if you bought a pre-installed SD card with Raspbian or NOOBS on it, you can just put the card into the slot on the back of the Pi:


Note: I bought a pre-installed SD card, but not as part of a starter kit. Apparently, the SD card was prepared for a Raspberry Pi 3 and not the Raspberry Pi 3+ that I am using (see this thread). Since the hardware differs considerably, I need to prepare the SD card manually, as if I had bought a blank one. And since this differs regarding the operating system you have on your main computer (Windows, Mac OS, Linux, ...), I cannot cover it here. However, there are many very good tutorials out there to help you with this. The best way in my opinion is to install NOOBS and then let it take care of everything. You can find a tutorial here.

3. Booting and Setup
Once everything is ready, plug in the power connector and watch your Pi start up and the SenseHat display some wonderful colors on its surface.

Before we can start coding, we need to install the aqi-library for python. We do that with the following command at the console:
pip install python-aqi
And that’s basically it!
4. Software
The software we are going to build is based on this GitHub repository and the original article at Hackernoon. But, we not only want to display the results on the console, we want it to be remotely accessible!
To develop, I use the built-in Thonny Simple IDE. You can find it in the Raspberry menu in “Development”. Save the file as aqi_sensor.py and make sure you don’t name it “aqi.py” (as this would confuse python when loading the python-aqi library)!

Since we want to be able to easily start the software, we include the following lines at the beginning of the file:
#!/usr/bin/python
# coding=utf-8
# "DATASHEET": http://cl.ly/ekot
# based on: https://gist.github.com/kadamski/92653913a53baf9dd1a8
We will be using the following libraries:
from sense_hat import SenseHat
import time
import sys
import aqi

import urllib2
import serial, struct, sys, time, json
And then start with constructing us a handle for the SenseHat:
sense = SenseHat()
sense.clear()
Sensor commands
To read out the sensor, we are going to need some commands borrowed from the above mentioned code. This is specific to the SDS011 and I’m not going to discuss them further:
DEBUG = 0
CMD_MODE = 2
CMD_QUERY_DATA = 4
CMD_SLEEP = 6
CMD_WORKING_PERIOD = 8
MODE_QUERY = 1

ser = serial.Serial()
ser.port = "/dev/ttyUSB0"
ser.baudrate = 9600

ser.open()
ser.flushInput()

byte, data = 0, ""

def dump(d, prefix=''):
    print(prefix + ' '.join(x.encode('hex') for x in d))

def construct_command(cmd, data=[]):
    assert len(data) <= 12
    data += [0,]*(12-len(data))
    checksum = (sum(data)+cmd-2)%256
    ret = "\xaa\xb4" + chr(cmd)
    ret += ''.join(chr(x) for x in data)
    ret += "\xff\xff" + chr(checksum) + "\xab"

    if DEBUG:
        dump(ret, '> ')
    return ret

def process_data(d):
    r = struct.unpack('<HHxxBB', d[2:])
    pm25 = r[0]/10.0
    pm10 = r[1]/10.0
    checksum = sum(ord(v) for v in d[2:8])%256
    return [pm25, pm10]

def read_response():
    byte = 0
    while byte != "\xaa":
        byte = ser.read(size=1)

    d = ser.read(size=9)

    if DEBUG:
        dump(d, '< ')
    return byte + d

def cmd_set_mode(mode=MODE_QUERY):
    ser.write(construct_command(CMD_MODE, [0x1, mode]))
    read_response()

def cmd_query_data():
    ser.write(construct_command(CMD_QUERY_DATA))
    d = read_response()
    values = []
    if d[1] == "\xc0":
        values = process_data(d)
    return values

def cmd_set_sleep(sleep=1):
    mode = 0 if sleep else 1
    ser.write(construct_command(CMD_SLEEP, [0x1, mode]))
    read_response()

def cmd_set_working_period(period):
    ser.write(construct_command(CMD_WORKING_PERIOD, [0x1, period]))
    read_response()
Main Loop
Next, we need a main loop that keeps running until we tell it stop. The later source code lines need to be placed within it. The loop makes sure the particle sensor gets to sleep for 30 seconds after each reading to prolong its life. Once we interrupt it (with Ctrl+C), we need to clear the SenseHat (we don’t display anything on it in this tutorial though).
if __name__ == "__main__":
    try:
        while True:
            cmd_set_sleep(0)
            cmd_set_mode(1);
            pm25 = None
            pm10 = None
            temp = None
            humidity = None
            pressure = None

            for t in range(15):
                #later code goes here!
                time.sleep(2)

            print("Going to sleep for 30secs...")
            cmd_set_mode(0);
            cmd_set_sleep()
            time.sleep(30)

    except KeyboardInterrupt:
          pass

    sense.clear()
Particle sensor readings
Reading out data from the particle sensor is pretty straight forward. We then use the python-aqi library to convert our sensor readings into an AQI value!
values = cmd_query_data();
    if values is not None and len(values)==2:
        if values[0] is not None and values[1] is not None:
            if not values[0] == " 0.0" and not values[1] == " 0.0":
                pm25 = values[0]
                pm10 = values[1]
                myaqi = aqi.to_aqi([
                    (aqi.POLLUTANT_PM25, pm25),
                    (aqi.POLLUTANT_PM10, pm10)
                ])
                print("Total AQI: ", str(myaqi), ", PM2.5: ", pm25, ", PM10: ", pm10)
SenseHat readings
To get readings from the SenseHat, we use
temp = sense.get_temperature()
temp = round(temp, 1)
print("Temperature C: " + str(temp))

humidity = sense.get_humidity()
humidity = round(humidity, 1)
print("Humidity: " + str(humidity))

pressure = sense.get_pressure()
pressure = round(pressure, 1)
print("Pressure: " + str(pressure))
Sending data to dweet.io and freeboard.io
Finally, we want to send things to freeboard.io, and we are going to use dweet.io for this. There is no need to sign up at dweet, we will just use their web API to send things where we want them. That works like this:
To send some data from one thing to another, we simply call a dweet URL like this:
https://dweet.io/dweet/for/my-thing-name?hello=worldIf we want to include more data, we can add that as parameters with key-value pairs:
https://dweet.io/dweet/for/my-thing-name?hello=world&foo=barmy-thing-name will be replaced with a unique identifier. To get a unique identifier hit your keyboard a couple of times until you end up with something like this:
https://dweet.io/dweet/for/wm3q59oiefhtcvfct43?hello=worldOf course, you can also add a name that makes sense, but really, it doens’t matter and this just makes it harder to guess.
In Python, we are then going to call the URL like this:
try: response = urllib2.urlopen('https://dweet.io/dweet/for/wm3q59oiefhtcvfct43?pm25=' + str(pm25) + '&pm10=' + str(pm10) + '&temp=' + str(temp) + '&hum=' + str(humidity) + '&press=' + str(pressure) + '&aqi=' + str(myaqi))
except urllib2.URLError as e:
    print(e.reason)
    continue
except Exception as e:
    print(e.message)
    continue
html = response.read()
print (html)
The last thing to do is to make everything executable:
chmod +x aqi_sensor.pyYou can then start it by typing
./aqi_sensor.pyAnd that’s it, we’re done! If you had difficulties putting everything together at the right place, please do 2 things:
Wow, my AQI is high - better turn up the air purifier!

Displaying AQI data on freeboard.io
To display results, we will be using freeboard. You get a free account for 30 days to try everything out. Just sign up through the website freeboard.io!
Once you’ve signed up, login. Then, enter a name for your new board (e.g. “my-aqi”) and click “Create New”:

You will be greeted by an empty board. The next thing we need to do is add a data source!


For TYPE we choose dweet.io, the NAME can be anything and the THING NAME is the key you’ve used earlier (please chose a different one than this tutorial!). Click SAVE and you are done.
For the next step to work, you need to make sure your Raspberry Pi has sent some data already to dweet. So best to turn it on and see whether you get a “succeed” message while running the script!
Next, we want to finally display our data! Click “ADD PANE” under the freeboard logo.

In the pane that gets created, click the little PLUS symbol. Chose TYPE “Text”, enter a TITLE, chose a VALUE from our datasource and then enable “INCLUDE SPARKLINE”

Now turn on the script and watch data appear! It might take a few seconds, but then, the magic happens!

I have of course added some more values from our dweet source, feel free to play around with it! You can also start reading more data from the SenseHat and send it to freeboard (there’s a ton of sensors on it).
To answer the original question: Yes, Air Purifiers are worth their money. I can clearly see the AQI value drop once I turn it on. :)
That’s it! If you liked this (or didn’t), leave a comment!